This is not yarn-related – sorry folks 😉 I just had the pleasure of walking around a beautiful garden the other day and wanted to share. These pictures were taken at Rancho Santa Ana Botanical Gardens here in Claremont. Enjoy the pretties!


Fiber Art and Product Design by Charissa Pray
This is not yarn-related – sorry folks 😉 I just had the pleasure of walking around a beautiful garden the other day and wanted to share. These pictures were taken at Rancho Santa Ana Botanical Gardens here in Claremont. Enjoy the pretties!
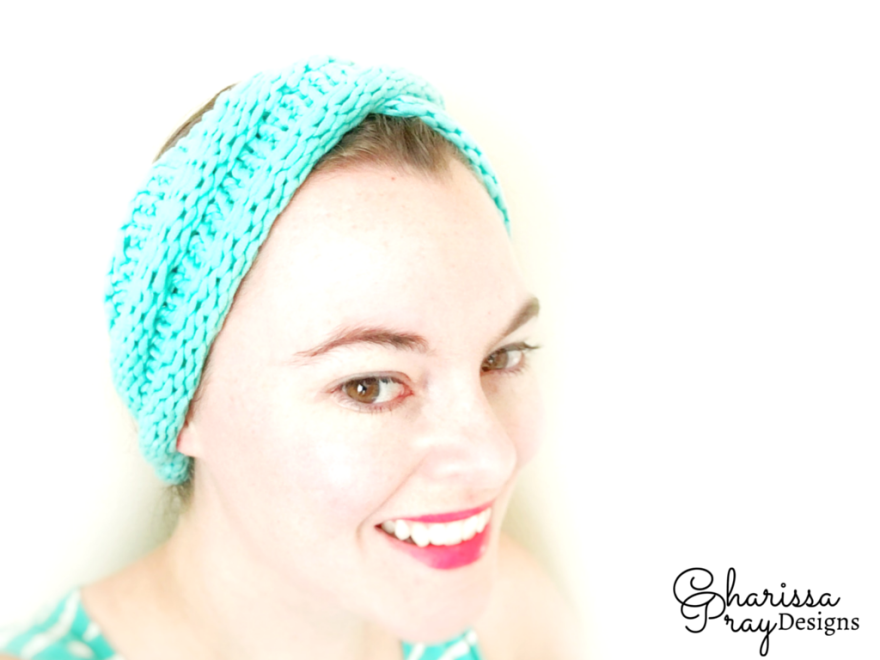
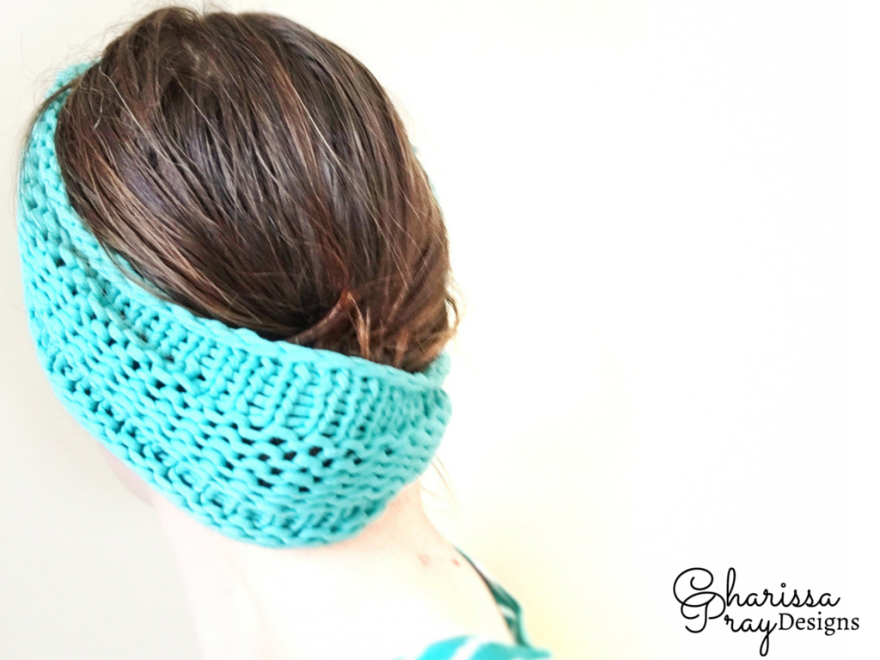
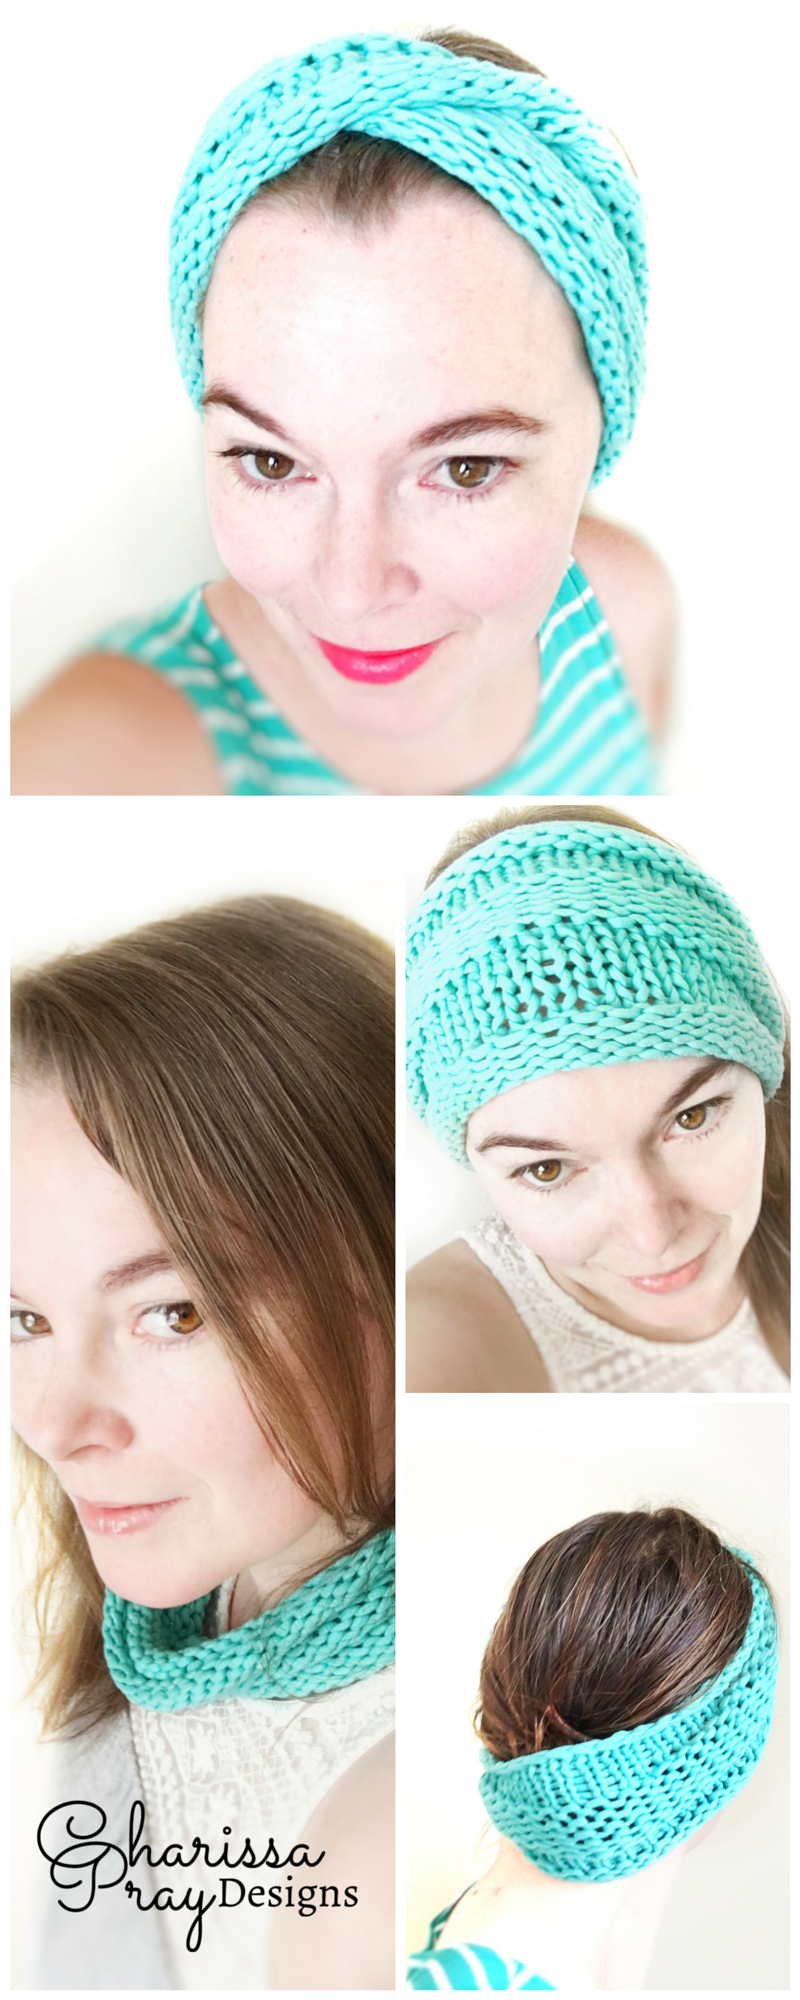
Today I want to share a super easy pattern with you. I am the most beginner-y of beginner knitters, so if I can make this, so can you. You only need to know how to cast on, knit, purl, and bind off. It’s in the round so you don’t need to alternate knit and purl rows to create the stockinette and reverse stockinette sections. And this is a very handy convertible item – it can be a headband, an ear warmer, or a cowl. It will even keep your hair frizz free while it’s drying – or let you sleep on your hair without getting bed head! The chunky cotton blend yarn makes it a quick knit you can whip up in an hour or two. Yay!
Please note: I haven’t had this pattern tested other than making it myself. If you find any errors, please let me know!
If you’d prefer to buy the finished item, it is available here: https://www.etsy.com/listing/468882345
Headband/cowl pattern:
Yarn: Bernat maker home dec (size 5 bulky)
Cast on 46 stitches on size 11, 8mm 20″ circular needles (I used the long tail cast on method). Work in the round and use stitch markers to mark the beginning of each round.
Knit 6 rows
Purl 6 rows
Knit 6 rows
Purl 6 rows
Knit 6 rows
Cast off
Weave in ends
Note: the ends tend to poke out with this yarn. I have found it helpful to put a bit of fabric glue on the ends to help keep them tucked in securely. Even with that, my ends came a-pokin’ out after I washed my headband – if anyone has ideas about this, let me know!
To make the twist I have in it here, you just twist it so part of it is inside-out before you put it on, like so:
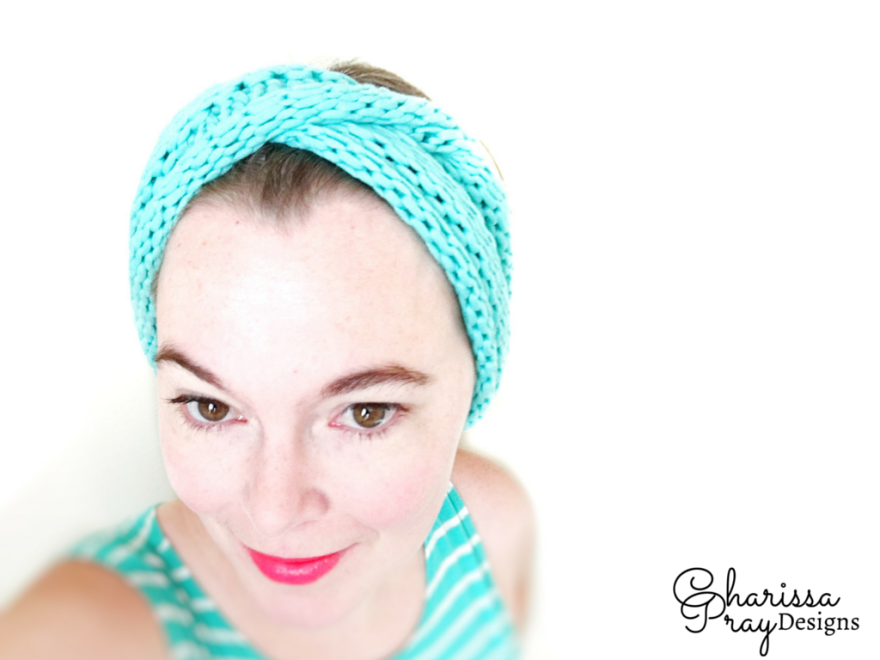
You can pull your hair into a loose bun and tuck it into the headband to keep it from getting frizzy after a shower! Enjoy the free pattern 😊
I confess – I went to hobby lobby again! 
I couldn’t find another of these baskets 😟
 So I had to get creative. They’re having a crazy sale right now! Wood decor, metal decor, boxes and baskets are all 50% off! I found this shelf in the nursery section. I thought it would fit on my bookshelf but it’s a bit too wide so I put it on my piano instead. What do you think? All of my yarn has a home now!
I even wrote a silly little poem about it:
Beneath the map my treasure lies
Worth more than gold to a crafter’s eyes
With strands of wool in tidy spools,
Aligned with cups of scraps and tools


In case it wasn’t obvious, I’m a huge yarn addict. I just destashed about 22 skeins and it didn’t make much of a dent. 😉
So I’m always looking for yarn storage solutions. I haven’t organized my whole yarn supply – I have a shelf with 3 paper bags full of yarn because I need some bins or something to contain them – but I did find a place for about half of it. This is a basket/table thing that I bought at Hobby Lobby. It was on clearance for around $30 I think. I might get another one so I have a matched set (and so I can get the rest of my yarn out of trader joes bags!). Even cooler than this yarn basket is IMHO is that Hobby Lobby responded to my tweet about it, and they like it! I’m geeking out a bit about it 😉
Check it out here: https://twitter.com/charissapray/status/752894893429821440

In the meantime, I’m also working on digital representations of the yarn I like to use so that I can show them in my Etsy listings. I haven’t gotten them all finished yet but here are several of them in my favorite fibers (cotton, wool, wool blends, chunky cotton…yum!)


Feel free to reference these for my patterns and items on my Etsy page, or for your own use – just link here if you don’t mind 🙂
Enjoy the rest of your week!
I’m back! Sorry I’ve been away. Have you ever been so frustrated with crocheting that you had to put everything on hold and take some time off? Well, the Charlie Chevron Cardigan had me so upset I had to put it on time out! Haha. I’ll come back to it at some point, but for now it’s on hold. But in the meantime I have been playing with my scrap yarn (do you like my clever scrap yarn holder? It’s a pasta cannister that was sitting in a cabinet)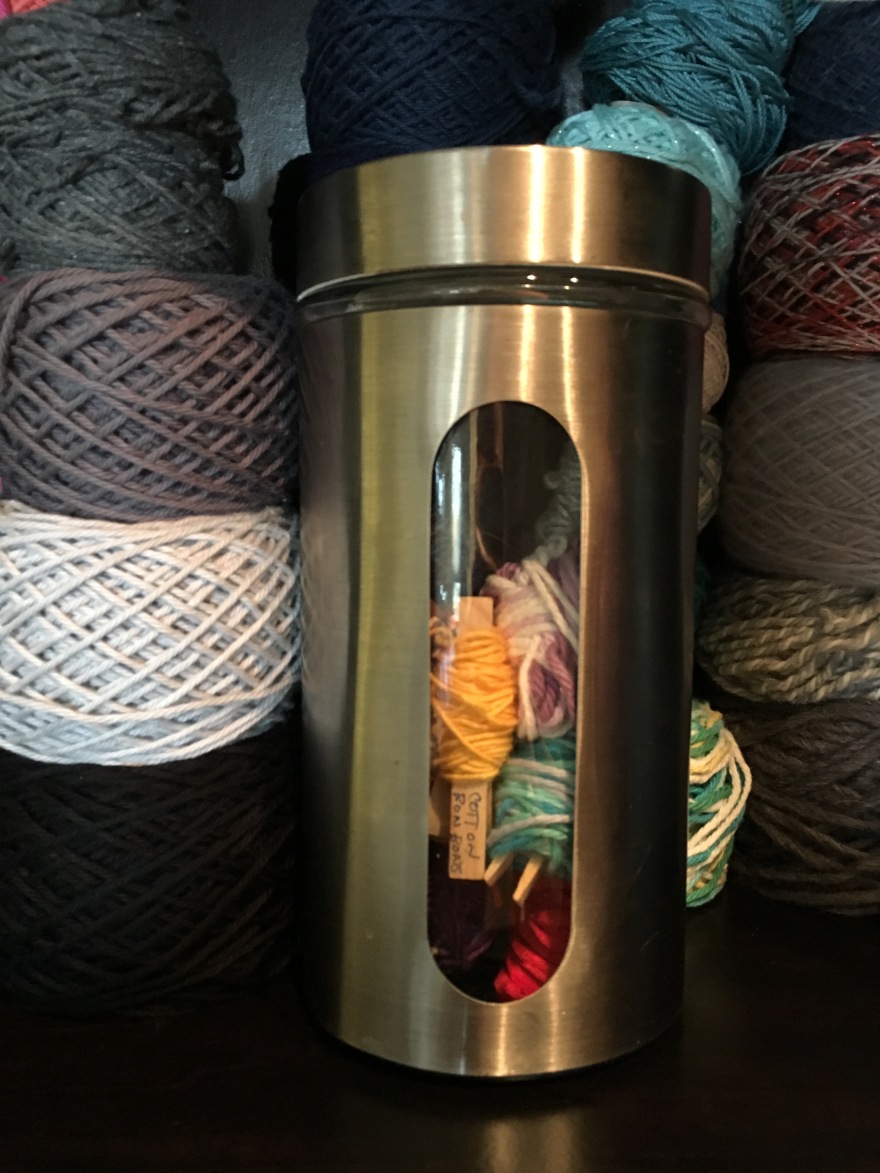 I also bought quite a bit of cotton and other natural fiber yarn with a birthday card from my parents – and organized it in a nice rainbow 🙂
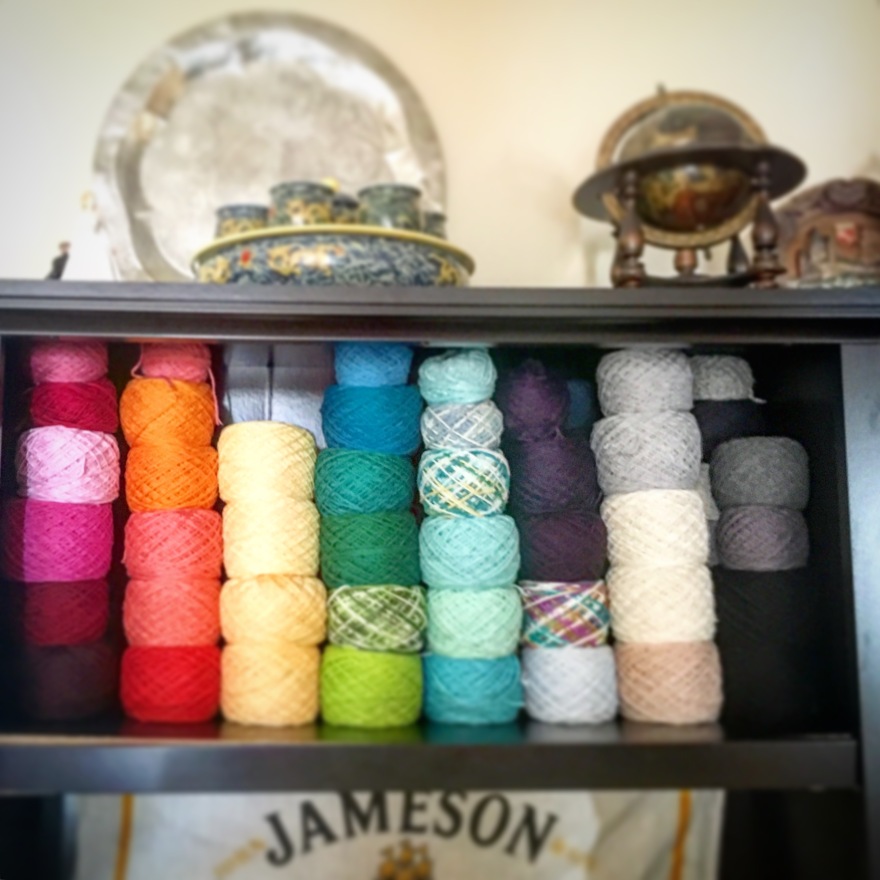
Isn’t that pretty? It inspired me to make something new. I needed a quick project, something that could use up some of my scrap yarn. Something useful. And so – I came up with this cute little fox! He’s happy to hold your earbuds, usb cords, and any other small cables you have around the house for you. Throw him in your purse and he’ll keep your earbuds from getting all tangled up. Put him on your desk and he’ll add a touch of whimsy while keeping your charging cord handy! You can buy a finished fox earbud holder on my Etsy shop here.
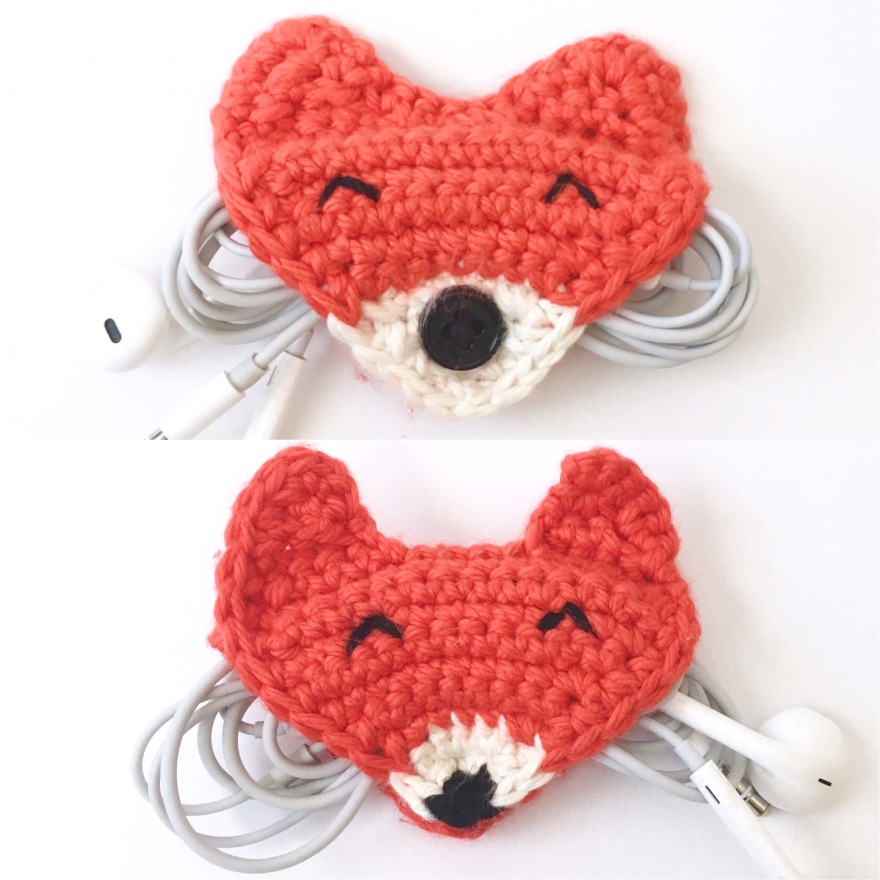 The pattern is available on Etsy and Ravelry for only $3! It can be made either with a button or a snap, whichever you have on hand. I love these little guys!
What do you think? Do you love foxes as much as I do? 🙂
I’ll be working on a cat next – something like this:
 meow meow!
The Charie Chevron Cardigan has been sent out to testers! I’m hoping the pattern will be released in about three weeks. In the meantime, I’m all finished with my sample and thought I would talk a little about blocking, buttons, and general finishing work.

I honestly had no idea if blocking with clothes pins like this would work! But my toddler was running around when I blocked this and I didn’t want her to pull it off the bed and get stuck with pins. I figured I could always redo it if I needed to, but it worked pretty well. I always forget what a big difference blocking makes until I actually do it. Here’s what it looked like before blocking:

Not bad, but definitely a little wonky!
If you’ve never blocked anything before, don’t worry – it’s easy! This post on Craftsy is really helpful.
Now here it is after blocking (and a little pressing with the iron – which works because this is cotton, but check your yarn label before you iron your piece!):

 Much straighter, right? Now I need to sew on my buttons. I like to put them on top of the buttonholes first to get them lined up properly:
 This is just to line them up, so that one that’s upside down is ok – just in case you’re wondering what the heck I’m doing! I just didn’t notice it at the time. Next I put a pin in each to mark the spot:
 I intentionally use pins with small enough heads that I can slide the button off of them and leave the pin in place. Then I use another pin just to make a clear X to mark where the buttons will go.

From there I can sew in my buttons. Now the sweater is finished! I’ll probably give it a final quick press with the iron before it goes to its new home but otherwise it’s done!


This is what kid’s art in my house normally looks like:
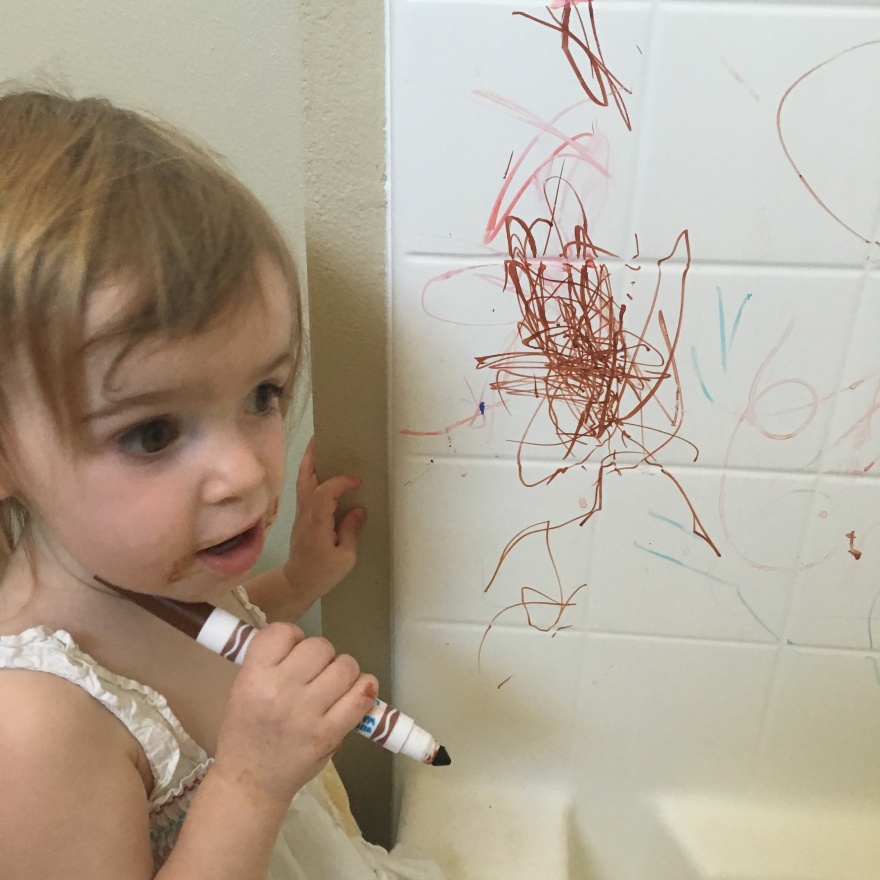
So I’m always looking for art projects I can do with my toddler that have less clean-up and that I’ll actually want to display – and not just on the refrigerator!
This idea was inspired by something I saw on Instagram, where a lettering artist created watercolor prints using a plastic bag and some markers and then used those as a background for hand lettering. Unfortunately I can’t remember who that was. But I thought it was so easy my toddler could do the watercolor part, and I could make the “print” using lettering I had already done so it would be a finished product! I love that we are making art together. So without further ado, here’s the super-easy tutorial on making little letters!
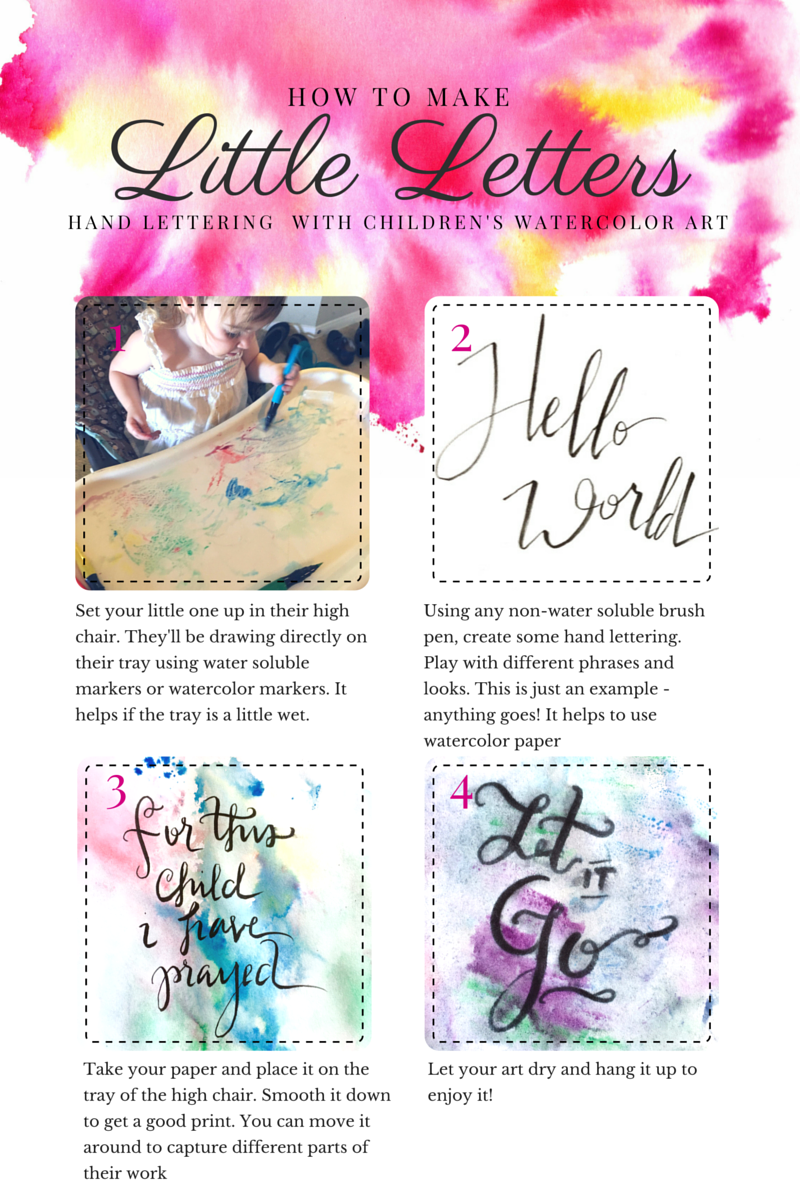
For the baby we used Crayola washable paint markers (this is not an affiliate link; I’m not that fancy yet!). I’m not entirely sure what the pen was that I used for the lettering on the left since it’s something I found in my sketchbook but on the right I used a basic crayola marker – and found that it didn’t work as well because they are washable so it smudged. If you have older kids, this works beautifully with watercolor brush pens such as these akashiya sai markers which I have, and love. I used this technique to create this watercolor wash with akashiya sai markers and added a quote. So pretty!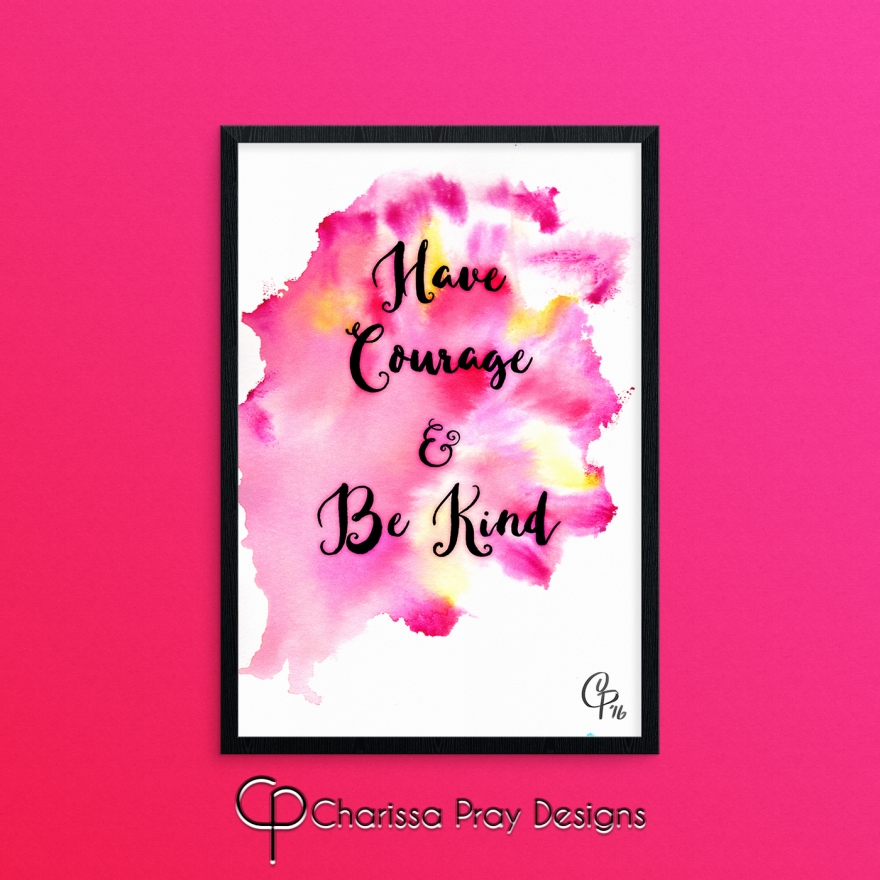
From now until Friday March 25th, use coupon code 2PATTERNSUP in my ravelry store and add both of my patterns to your cart to get both patterns for the price of one! Just a little gift to celebrate my second pattern being released ❤️
You’ll get both the cobblestone bag and the darling danger dress!

 Also, look at this cutie modeling the darling danger dress! I sent out this custom order to her and she and her mom are loving it! I’m thrilled to bits. She’s adorable!

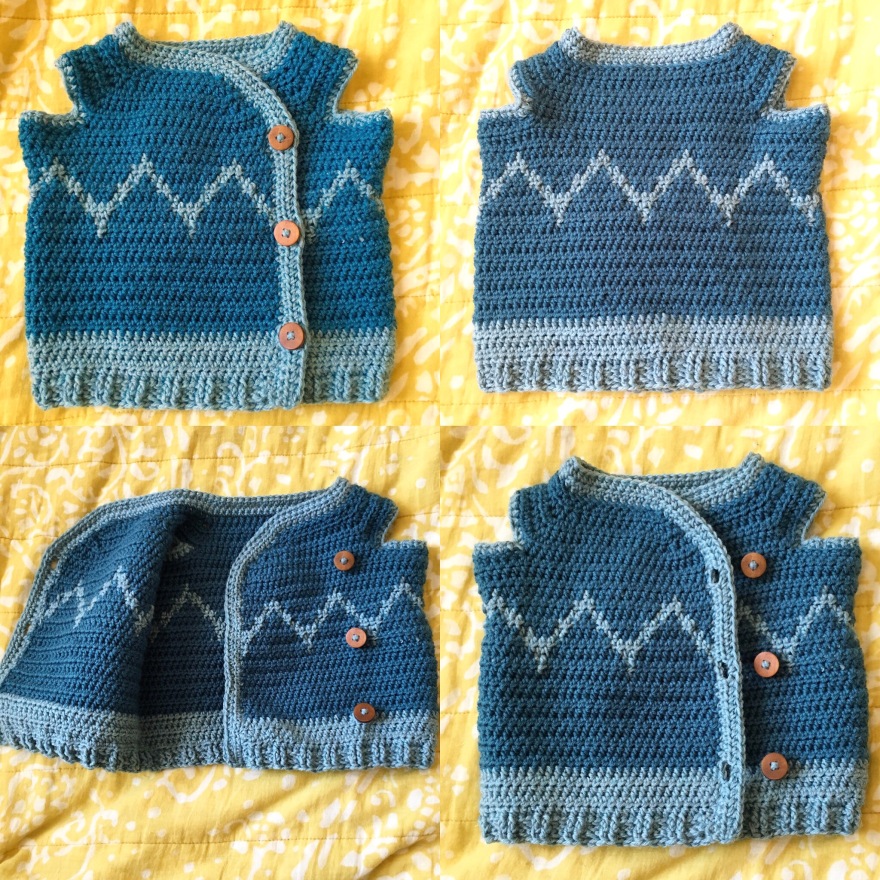
I’m just starting this new pattern but I wanted to share a little preview of it. A friend of mine is having a baby boy in April so I worked up this little sweater vest for him. There is a surprisingly small amount of stuff out there for boys so I wanted to make something that could really be handsome on a little guy – but also with the right colors could be cute on a little girl! I’m thinking I will call it the Charlie Chevron Cardigan – because it looks a bit like Charlie Brown’s shirt.
The sweater is mostly worked in half double crochet, and uses foundation half double crochet to start as well as to form the armholes. This technique can be seen in my previous post, the video tutorial. The chevron portion is worked in tapestry crochet, with the contrast color carried along for a very securely woven fabric. The sweater has a generous overlap in front to keep your baby nice and cozy, and it buttons on the side for a very fashionable look. It can be made into either a sleeved sweater or a vest.
I’m still working on writing up the pattern, and then I’ll be looking for testers and will give them a couple weeks to work on it. All part of the process! I’ve already started working on some step-by-step photos though, in red cotton! I think it’s going to be very cute 🙂 Please forgive the photos – I haven’t gone through and adjusted the lighting or anything yet.
Check back in a couple weeks for the finished pattern!


I’ve put together a quick video tutorial showing how I use foundation crochet stitches (the video shows foundation half double crochet but this can be applied to foundation single or double crochet as well) to create straps, handles, and armholes! I hope it’s helpful. If you are working on the Darling Danger dress, this tutorial will help with the straps, as seen in the featured image. And in a couple weeks I’ll be putting up a new cardigan pattern which will use this technique to create the sleeve holes so that the body can be made in one piece from the top down and the sleeves can be crocheted directly into the sleeve holes! So, without further ado, here is the video:
And here’s a sneak peak of the sweater design I’m working on!